Introduction to Laser-Cut Stencils
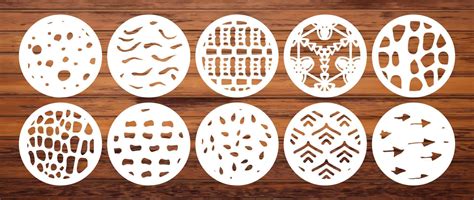
Laser-cut stencils have revolutionized the world of art and crafts, providing artists, designers, and DIY enthusiasts with a precise and efficient way to create stunning designs on various surfaces. These stencils are made using laser cutting technology, which allows for intricate and detailed patterns to be cut from materials such as paper, plastic, or metal. The versatility and accuracy of laser-cut stencils have made them a popular choice for a wide range of applications, from home decor projects to large-scale murals.
What Are Laser-Cut Stencils?
Laser-cut stencils are templates created using a laser cutting machine, which uses a high-powered laser beam to cut designs into various materials. The laser follows a predetermined path, which is typically created using computer-aided design (CAD) software. This process allows for highly detailed and precise cuts, making it possible to create intricate patterns and designs that would be difficult or impossible to achieve with traditional cutting methods.
Advantages of Laser-Cut Stencils
There are several advantages to using laser-cut stencils over traditional hand-cut stencils or other stenciling techniques:
- Precision: Laser cutting offers unparalleled accuracy, ensuring that the stencil design is cut exactly as intended, with clean, crisp edges.
- Consistency: Because the laser follows a pre-programmed path, each stencil produced is identical, making it easy to create consistent results across multiple projects.
- Efficiency: Laser cutting is a fast process, allowing for the production of multiple stencils in a short amount of time. This is particularly beneficial for large-scale projects or when producing stencils in bulk.
- Durability: Laser-cut stencils can be made from sturdy materials like plastic or metal, making them more durable and long-lasting than paper stencils.
- Versatility: With laser cutting, it’s possible to create stencils in a wide range of sizes, from small, intricate designs to large-scale patterns suitable for murals or outdoor projects.
Materials Used for Laser-Cut Stencils
Laser-cut stencils can be made from various materials, each with its own unique properties and advantages. Some of the most common materials used for laser-cut stencils include:
Paper
Paper is an affordable and widely available option for laser-cut stencils. It’s best suited for single-use or short-term projects, as paper stencils can become damaged or worn with repeated use. However, thicker paper stocks or cardstock can provide more durability.
Plastic
Plastic is a popular choice for laser-cut stencils due to its durability and flexibility. Mylar, a type of polyester film, is often used for creating stencils because it’s resistant to tearing and can withstand repeated use. Other plastic materials, such as acrylic or polypropylene, can also be used for stencils.
Metal
Metal stencils, typically made from thin sheets of stainless steel or brass, offer the highest level of durability and are suitable for heavy-duty or long-term use. Metal stencils can withstand repeated cleaning and are resistant to wear and tear, making them ideal for industrial applications or for use with abrasive media like sand or glass etching.
Designing Laser-Cut Stencils
Creating a laser-cut stencil begins with designing the pattern or artwork that will be cut into the chosen material. There are several factors to consider when designing a stencil:
Software and File Preparation
Most laser cutting machines work with vector-based artwork, which means that the design must be created or converted into a compatible format, such as AI, EPS, or SVG. Popular design software for creating vector artwork includes Adobe Illustrator, CorelDRAW, and Inkscape.
When preparing the design file for laser cutting, it’s essential to ensure that all lines are connected and that there are no overlapping or open paths. The artwork should also be sized appropriately for the intended application and the capabilities of the laser cutting machine.
Bridges and Islands
One of the key considerations when designing a stencil is the use of bridges and islands. Bridges are small connecting points that hold the interior parts of the stencil together, preventing them from falling out when the stencil is cut. Islands are the floating pieces of material that are not connected to the main stencil frame.
To create a functional stencil, it’s important to include bridges in the design to keep islands attached to the main stencil. The size and placement of bridges can affect the overall appearance of the stenciled image, so it’s essential to consider their impact on the final result.
Negative and Positive Space
Stencils work by creating a contrast between the negative space (the areas that are cut out) and the positive space (the remaining material). When designing a stencil, it’s important to consider the balance between these two elements and how they will interact with the surface being stenciled.
Intricate designs with a lot of negative space may require more bridges to maintain structural integrity, while simpler designs with more positive space may be easier to cut and use.

Framing Laser-Cut Stencils
Once a laser-cut stencil has been created, it can be used as-is or mounted in a frame for added durability and ease of use. Framing a stencil involves creating a border or support structure around the perimeter of the stencil, which can help to keep the stencil flat and prevent it from bending or warping during use.
Benefits of Framing Stencils
Framing a laser-cut stencil offers several advantages:
- Durability: A frame provides additional support and protection for the stencil, helping to prolong its lifespan and prevent damage during use or storage.
- Ease of Use: A framed stencil is easier to handle and position on a surface, as the frame provides a stable edge to hold and align the stencil.
- Consistency: Using a framed stencil can help to ensure consistent placement and results when applying the stencil multiple times or across a large surface area.
- Versatility: Frames can be customized to suit the specific needs of a project, such as incorporating registration marks for multi-color stenciling or creating a handle for easier maneuvering.
Frame Materials and Construction
Stencil frames can be made from various materials, depending on the intended use and the material of the stencil itself. Some common frame materials include:
- Wood: Wooden frames are affordable and easy to construct, making them a popular choice for DIY stencil projects. They can be cut to size and joined using simple tools and techniques, such as mitered corners and wood glue.
- Metal: Metal frames, such as those made from aluminum or steel, offer a higher level of durability and are well-suited for heavy-duty or industrial applications. They can be welded or fastened together using screws or rivets.
- Plastic: Plastic frames are lightweight and resistant to moisture, making them a good choice for stencils that will be used in outdoor or wet environments. They can be cut and assembled using adhesives or heat-welding techniques.
When constructing a stencil frame, it’s important to ensure that the frame is properly sized and aligned with the stencil design. The frame should be sturdy enough to support the stencil material without adding too much bulk or weight, and it should allow for easy cleaning and storage when not in use.
Applications of Laser-Cut Framed Stencils
Laser-cut framed stencils have a wide range of applications across various industries and creative fields. Some of the most common uses include:
Art and Crafts
Laser-cut stencils are a popular tool for creating unique and intricate designs in art and craft projects. They can be used to apply patterns and images to surfaces such as paper, fabric, wood, or canvas, using various media like paint, ink, or spray dye.
Framed stencils are particularly useful for larger-scale projects or when working with multiple layers or colors, as they provide a stable and consistent base for applying the design.
Home Decor
Stencils can be used to add decorative elements to walls, floors, furniture, and other household items. Laser-cut stencils allow for the creation of precise and detailed patterns, such as geometric shapes, floral motifs, or typography, which can be applied using paint or other decorative finishes.
Framed stencils are ideal for larger-scale home decor projects, such as stenciling an accent wall or creating a repeated pattern on a floor or ceiling.
Signage and Markings
Laser-cut stencils are commonly used in the creation of signs, labels, and other forms of visual communication. They can be used to apply lettering, logos, or symbols to various surfaces, such as metal, plastic, or concrete, using paint, etching cream, or sandblasting.
Framed stencils are particularly useful for creating consistent and accurate markings across multiple items or locations, such as in industrial settings or for branding purposes.
Textile and Fashion Design
Laser-cut stencils can be used to create unique patterns and designs on textiles, such as clothing, accessories, or home furnishings. They can be applied using various techniques, such as screen printing, block printing, or fabric painting.
Framed stencils can help to ensure consistent placement and registration of designs when working with larger fabric pieces or when creating repeating patterns.
Industrial and Manufacturing
In industrial settings, laser-cut stencils are used for a variety of applications, such as marking parts and components, applying coatings or finishes, and creating labeling or packaging designs.
Framed stencils are often used in these contexts to ensure accuracy and consistency across large production runs or when working with specialized materials or processes.
Frequently Asked Questions (FAQ)
1. What is the best material for creating a durable, reusable laser-cut stencil?
For a durable and reusable laser-cut stencil, the best material options are plastic (such as Mylar or acrylic) or metal (like stainless steel or brass). These materials are resistant to wear and tear and can withstand repeated use and cleaning.
2. Can I create a laser-cut stencil design using raster-based software like Photoshop?
While it is possible to create a stencil design in raster-based software like Photoshop, most laser cutting machines require vector-based artwork. To use a raster-based design, you would need to convert it into a vector format using software like Adobe Illustrator or Inkscape.
3. How do I determine the appropriate size and placement of bridges in my stencil design?
The size and placement of bridges in a stencil design depend on factors such as the intricacy of the pattern, the size of the islands, and the material being used. As a general rule, bridges should be small enough to minimize their visual impact on the final stenciled image but large enough to provide adequate support for the islands. Experimentation and testing can help you find the right balance for your specific design and application.
4. What are some tips for aligning and securing a framed stencil on a surface?
To align and secure a framed stencil on a surface, consider the following tips:
- Use registration marks or guides to ensure consistent placement when applying the stencil multiple times or across a large area.
- Secure the stencil frame to the surface using tape, spray adhesive, or other removable adhesives to prevent shifting or bleeding.
- For uneven or textured surfaces, use a stencil brush or dabbing motion to apply the paint or medium, rather than brushing or rolling, to avoid pushing the stencil material into the surface irregularities.
5. How do I clean and store my laser-cut framed stencils to maximize their lifespan?
To clean and store your laser-cut framed stencils properly:
- Clean the stencil immediately after use with soap and water (for water-resistant materials) or an appropriate solvent (for non-water-resistant materials) to remove any residual paint or medium.
- Allow the stencil to dry completely before storing to prevent warping or mold growth.
- Store the stencil flat or hanging vertically to minimize the risk of damage or distortion.
- Keep the stencil in a cool, dry place away from direct sunlight or extreme temperatures to prevent material degradation over time.
By following these guidelines, you can help to extend the life of your laser-cut framed stencils and ensure that they continue to produce high-quality results across multiple projects and applications.
Conclusion
Laser-cut framed stencils offer a versatile and efficient solution for creating precise, detailed, and repeatable designs across a wide range of applications, from art and crafts to industrial manufacturing. By understanding the materials, design considerations, and framing techniques involved in creating these stencils, users can unlock new possibilities for creative expression and functional marking.
As laser cutting technology continues to evolve and become more accessible, the potential uses for laser-cut framed stencils will only expand, enabling artists, makers, and professionals to push the boundaries of what’s possible with this powerful and precise tool. Whether you’re a seasoned stencil artist or a beginner looking to explore new creative avenues, laser-cut framed stencils provide a gateway to a world of endless design opportunities.
No responses yet